Have you ever tasted store-bought hummus and thought, “This is good, but something’s missing”? Well, I’m about to share my absolute favorite hummus recipe that will ruin store-bought versions for you forever! After years of tweaking and perfecting, I’ve developed what I (and many friends and family members) consider to be the BEST hummus recipe you’ll ever try.
The Secret to Incredible Hummus
When I first started making hummus at home, it was decent—but not life-changing. It took me several years and countless batches to discover the true secrets to silky-smooth, intensely flavorful hummus that rivals even the best Middle Eastern restaurants.
The game-changer? Removing the chickpea skins. Yes, it takes a bit of extra time, but this single step transforms your hummus from good to exceptional. That, plus using the right amount of tahini and a technique I learned from a Lebanese chef, creates the creamiest, most delicious hummus imaginable.
Ingredients That Make The Difference
I’ve found that quality ingredients make all the difference in hummus. Here’s what you’ll need:
- 1 (15 oz) can of chickpeas (or 1½ cups cooked chickpeas)
- ⅓ cup of tahini (use the good stuff!)
- 3 tablespoons fresh lemon juice (about 1 large lemon)
- 2 medium garlic cloves, peeled
- 2 tablespoons extra virgin olive oil, plus more for serving
- ½ teaspoon ground cumin
- ¾ teaspoon kosher salt
- 2-3 tablespoons cold water
- Paprika and chopped fresh parsley for garnish
Let’s Talk About Tahini
Not all tahini is created equal! After trying numerous brands, I’ve discovered that tahini quality dramatically affects your hummus. Look for tahini that’s creamy, not separated, with a nutty flavor without any bitterness. The best tahini should taste almost like a savory version of peanut butter. Middle Eastern or Mediterranean grocery stores often carry excellent tahini options that outperform mainstream supermarket brands.
The Step-by-Step Process
Step 1: Prep the Chickpeas (The Most Important Step!)
If using canned chickpeas, drain and rinse them thoroughly. Now for the secret technique: remove the skins! Here’s how I do it efficiently:
- Place the chickpeas in a large bowl filled with water
- Gently rub the chickpeas between your palms
- The skins will float to the top
- Skim off the skins and discard them
- Drain the chickpeas
This process takes about 5-7 minutes but makes an enormous difference in the final texture.
Step 2: Blend the Perfect Base
- In a food processor, combine the tahini and lemon juice first. Process for about 1 minute.
- Scrape down the sides, then add the garlic, olive oil, cumin, and salt.
- Process for another 30 seconds, until the mixture is smooth and light in color.
This initial step of blending the tahini with lemon juice creates an emulsion that results in an incredibly creamy base.
Step 3: Add the Chickpeas
- Add half the skinned chickpeas to the food processor and process for 1 minute.
- Scrape down the sides, add the remaining chickpeas, and process until completely smooth, about 1-2 minutes.
- If the hummus is too thick, add cold water 1 tablespoon at a time while processing until you reach your desired consistency.
The hummus should be silky smooth. If it still feels grainy, continue processing—patience is key!
Step 4: Taste and Adjust
This step is crucial and often overlooked! Dip a spoon into your hummus and taste it.
- Need more lemony tanginess? Add more lemon juice.
- Want more depth? Add a pinch more cumin.
- Not salty enough? Add a pinch of salt.
- Needs more richness? Drizzle in a bit more olive oil while processing.
The perfect hummus should have a balance of flavors—nutty from the tahini, bright from the lemon, savory from the garlic, and earthy from the cumin.
Serving Your Masterpiece
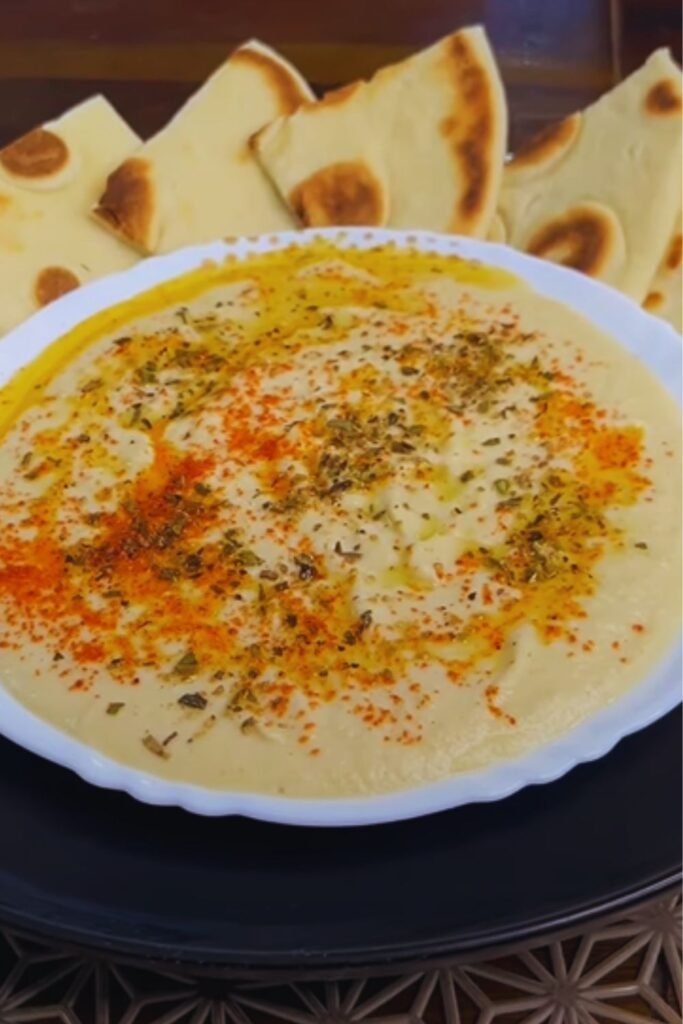
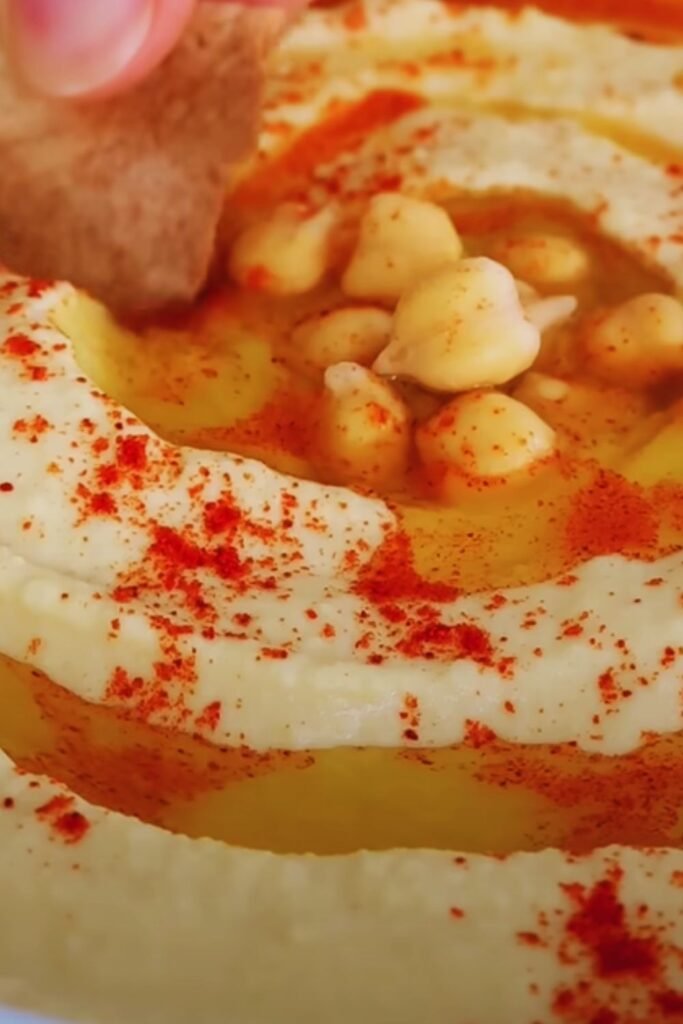
Authentic hummus isn’t just about how you make it, but also how you serve it. Here’s how to present your hummus like a pro:
- Transfer the hummus to a shallow bowl.
- Using the back of a spoon, create a swirl or well in the center.
- Drizzle generously with your best extra virgin olive oil.
- Sprinkle with paprika and fresh chopped parsley.
- Optional: add a few whole chickpeas in the center for decoration.

Delicious Variations to Try
Once you’ve mastered the classic recipe, get creative with these fantastic variations:
Roasted Red Pepper Hummus
Add 1 roasted red bell pepper (jarred or homemade) to the food processor with the chickpeas.
Roasted Garlic Hummus
Substitute the fresh garlic with 1 head of roasted garlic cloves. The mellow, sweet flavor is incredible!
Jalapeño Cilantro Hummus
Add 1 seeded jalapeño and ¼ cup fresh cilantro leaves for a spicy, herbaceous kick.
Caramelized Onion Hummus
Fold in ½ cup of cooled caramelized onions after the hummus is processed.
Za’atar Hummus
Sprinkle 1-2 teaspoons of za’atar spice blend on top before serving for an authentic Middle Eastern flavor.
Perfect Pairings
Hummus isn’t just delicious—it’s versatile! Here are my favorite ways to enjoy it:
- With warm, fresh pita bread
- With crisp, fresh vegetables like carrot sticks, cucumber slices, and bell pepper strips
- Spread inside a wrap with grilled vegetables
- As a base for Mediterranean bowls with falafel and tabbouleh
- Dolloped on top of roasted vegetables
- As a healthier alternative to mayonnaise in sandwiches
Nutritional Benefits of Hummus
Let’s talk about why hummus isn’t just delicious but good for you too!
| Nutrient | Amount per ¼ cup serving | Benefits |
|---|---|---|
| Protein | 4-5g | Builds and repairs tissues, supports immune function |
| Fiber | 3-4g | Promotes digestive health, helps maintain steady blood sugar |
| Healthy Fats | 6-8g | Supports heart health, provides sustained energy |
| Iron | 1-2mg | Essential for red blood cell production |
| Folate | 50-70mcg | Important for cell division and DNA synthesis |
| Vitamin B6 | 0.2-0.3mg | Supports brain development and function |
| Manganese | 0.5-0.8mg | Aids in bone formation and metabolism |
Chickpeas are rich in plant-based protein and fiber, while tahini provides calcium and healthy fats. Together, they create a nutritionally balanced food that’s satisfying and wholesome.
Storage Tips
Homemade hummus will keep in an airtight container in the refrigerator for up to 5 days. The flavors often develop and improve after a day, making this a perfect make-ahead dish.
If you find your hummus has thickened too much in the refrigerator, simply stir in a tablespoon of water or olive oil before serving to restore its creamy consistency.
Troubleshooting Common Hummus Problems
Even experienced hummus makers sometimes encounter issues. Here’s how to fix them:
Problem: Hummus is too grainy
Solution: Did you remove the chickpea skins? If yes, try processing for a longer period—sometimes it takes up to 3-4 minutes of continuous processing to achieve silky smoothness. Also, adding a couple of ice cubes during processing can help break down the chickpeas.
Problem: Hummus is too thick
Solution: Add cold water one tablespoon at a time while the food processor is running until you reach the desired consistency.
Problem: Hummus is too thin
Solution: Add more chickpeas or a tablespoon of Greek yogurt to thicken.
Problem: Bitter taste
Solution: Your tahini might be the culprit. Some brands can be quite bitter. Try a different brand, or balance the bitterness with more lemon juice and a pinch of sugar.
Problem: Not flavorful enough
Solution: Let it rest! Hummus flavors develop and intensify after a few hours in the refrigerator. Also, don’t underestimate the power of salt to bring out flavors.
Budget-Friendly Tips
Homemade hummus is already economical compared to store-bought versions, but here are some ways to make it even more budget-friendly:
- Cook dried chickpeas instead of using canned. A pound of dried chickpeas costs about the same as two cans but yields three times as much.
- Make your own tahini by toasting and grinding sesame seeds with a little olive oil.
- Freeze in portions. Hummus freezes surprisingly well for up to 3 months. Portion it into small containers and thaw as needed.
- Use bottled lemon juice if fresh lemons are expensive in your area (though fresh is preferable for flavor).
- Skip the fancy toppings when on a budget. The hummus is delicious on its own!
Frequently Asked Questions
Q: Do I really need to remove the chickpea skins? While you can make hummus without removing the skins, taking this extra step is what creates that ultra-smooth, restaurant-quality texture. If you’re short on time, you can skip it, but your hummus won’t be quite as silky.
Q: Can I use dried chickpeas instead of canned? Absolutely! In fact, cooking your own chickpeas from dried often results in even better hummus. You’ll need to soak 3/4 cup dried chickpeas overnight, then simmer until very tender, about 45-60 minutes.
Q: My hummus tastes bitter. What went wrong? The bitterness likely comes from your tahini. Some brands can be quite bitter. Try a different brand, or balance the bitterness with more lemon juice and a tiny pinch of sugar.
Q: How long does homemade hummus last? When stored in an airtight container in the refrigerator, homemade hummus lasts 4-5 days. The flavors often improve after the first day!
Q: Can I freeze hummus? Yes! Hummus freezes well for up to 3 months. The texture might change slightly upon thawing, but a quick stir usually restores its creaminess.
Q: Can I make hummus without tahini? While tahini is traditional and provides that distinctive flavor, you can make a tahini-free version. Substitute with Greek yogurt for a tangy twist or use a bit more olive oil for richness.
Q: Is hummus healthy? Yes! Hummus is packed with plant protein, fiber, healthy fats, and various vitamins and minerals. It’s considered a nutritious addition to most diets.
Q: What can I serve with hummus besides pita bread? Fresh vegetables like carrots, cucumbers, and bell peppers are perfect. Try it with tortilla chips, pretzels, or spread on sandwiches and wraps. It also makes a great base for grain bowls!
The Cultural Significance of Hummus
Hummus has been a staple in Middle Eastern and Mediterranean cuisine for centuries. Its origins are debated, with Lebanon, Israel, Greece, Egypt, and other countries all claiming it as their own. This delicious chickpea spread has become a symbol of both division and unity in the region.
What I find fascinating is how hummus transcends borders and politics. It’s a food that brings people together, served at family gatherings, celebrations, and everyday meals across cultural divides. When you make this recipe, you’re participating in a culinary tradition that spans generations and geography.
My Personal Hummus Journey
I still remember the first time I tasted truly exceptional hummus. It was at a tiny restaurant in a busy market, served simply with olive oil and warm bread. The owner noticed my obvious enjoyment and proudly shared that the recipe had been in his family for generations.
That moment sparked my obsession with creating the perfect hummus at home. It took years of experimentation, but the recipe I’m sharing with you today is the culmination of that journey—techniques learned from chefs, tips gathered from grandmothers, and my own discoveries along the way.
Every time I make this hummus for friends and family, I’m reminded of that market encounter and the power of food to create memorable experiences. I hope this recipe becomes a favorite in your home too.
Final Thoughts
Making truly exceptional hummus at home isn’t complicated, but it does require attention to detail and quality ingredients. The extra step of removing the chickpea skins might seem fussy, but it’s what separates good hummus from incredible hummus.
Remember that hummus is meant to be enjoyed fresh and at room temperature—take it out of the refrigerator about 30 minutes before serving to allow the flavors to fully develop.
Most importantly, don’t be afraid to make this recipe your own. Adjust the garlic, lemon, and salt to suit your taste. Add your favorite spices or toppings. The best hummus is the one that makes you happy!
I hope you enjoy this recipe as much as I do. Once you taste homemade hummus, I promise you’ll never want to go back to store-bought again!